
Hopefully this post helps other people who are experiencing the same problem or have trouble with their Beagle 480.
I do want to say something first, that the Beagle 480 is a great and amazing product to be able to view USB traffic in real time and I highly recommend them to anyone doing any development with USB. I would happily buy a replacement or pay for repair, but they are quite out of my price range which is why I have purchased them used, and want to document this information for those who are like me and don’t have a lot of money to purchase a new one if it breaks and want to attempt repair them self. I may still contact the manufacturer to see what they will say, but seeing that I have opened it, and attempted repair (I removed a chip!) it does not seem to be leaning in my favor.
All of the information here was based on information from the website listed below the next paragraph any my own reverse engineering, I have no inside knowledge of this product, but it would have helped!!!
I’ll get right to the point and the meat of the topic here. Just a little background first. I purchased a Beagle 480 USB analyzer for projects at work from eBay in a supposedly used but working condition, upon receipt I found it connected up correctly, the software recognized it, but it didn’t record data. This was fixed by the help of this wonderful post.
https://www.bunniestudios.com/blog/?p=4106
I experienced the exact same problems as the poster, purchased my first hot air rework station, which I had been pondering about for a long time, ordered the parts off Digikey, and replaced the USB3300 chip that was fried, most likely from misuse of the round DIN connector port for external input.
I am including some pictures from the original poster’s web site incase the ever disappear. I hope there is no issue with this. The original image URLs are also included. Clicking on the images will open up the original larger size.
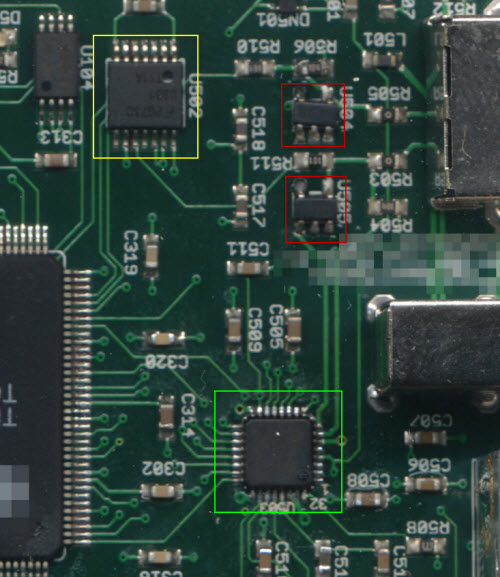
The part that I replaced is the USB3300 shown in green. It works great now! For less than half the price of a new one I am quite happy, plus it forced me to finally got a hot air rework station and all the necessary things to do hot air rework.
To be complete, the parts in red are LMH6559, 1.75GHz bandwidth amplifiers marked “B05A” on top. The part in yellow is a Fairchild USB1T11A, a full-speed USB transceiver. Information courtesy of https://www.bunniestudios.com/blog/?p=4106.
After this was repaired I received a message from the eBay seller that I bought this from and he offered to sell me a for sure broken one at a discount, I took it thinking that it would be as easy to fix as the first one. I connected it to my MacBook Pro to see if the symptoms were the same and it didn’t even pop up in the software when I connected it! Well, it seemed it was not going to be so easy to fix.
Attempting to figure out what was going on I checked if anything even popped up as a USB device when it was connected, and something did! But, it was not the correct vendor and device ID as expected. The device came in as a 0x8613 and 0x04b4 which matches with what the CY7C68013A will enumerate as if not configured.
Well, at least something was showing up and not all hope was lost… or was it. The next thing came to opening it up and poking around inside to see what happened. When plugged in the green power LED was a little bright compared to the working Beagle 480. This didn’t seem like a good sign…
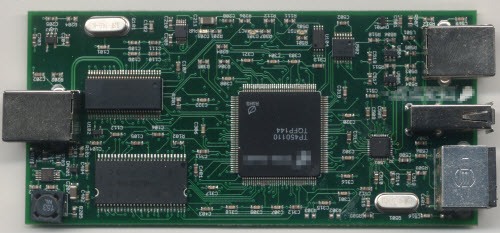
Checking the usual things I found that the 3.3 volt rail has 5 volts on it! This most likely is the cause of it not working. I traced the power supply back to a small chip next to the USB port shown on the left side of the image on top, the side of the board with a single USB connector. Next to this USB port appears to be a 5.0 to 3.3 volt buck converter complete with an inductor and capacitor. It was outputting 5.0 volts! The first thing was to get this chip off the board since it isn’t doing any good injecting 5.0 volts into the 3.3 volt rail.
Now, to figure out what this part was took a fair bit of research as the codes on SMD parts are far from standardized. With the knowledge that this is most likely a 3.3 volt switching regulator I searched. Eventually I came up with a TI part TPS62007DGS, for the part marked “AIO” and it is confirmed by looking at the data sheet!
This solved the issue of finding a replacement part, I could now order it! What about the other parts? Long story short I first attempted to identify the chip in the middle of the board marked TQFP144. This is a remarked chip and based on the connections of the power supply rails I have eliminated the candidates down to two most likely chips, both by Microsemi, ProASIC3e (A3P060) or a ProASIC3e (A3P125). The data sheet links will be at the bottom of this post.
Now, there is one last mystery part that is marked “AVE” that took quite a bit of digging, but once I figured out the FPGA was one of the above parts, I found the core power supply rail is 1.5 volts, so it most likely is a 1.5 volt regulator of some sort, and I was right! I identified it as another TI part TPS60503DGS.
The pieces of the puzzle are slowly falling together and I now can put names on all the parts on the board!
Since the 3.3 volt supply is fried (and removed from the board) I connected a LI Ion battery to it, it is not quite 3.3 volts, more like 3.6, but with 5.0 volts being injected for such a long time, 3.6 volts wasn’t going to do any more damage to things as a temporary hack.
Now, I can verify the 1.5 volt supply is still alive, but it still didn’t come back to life, still reporting the same incorrect USB enumeration vendor and product IDs.
Where to go from here, there are several things that might have happened with the 5.0 volt injection into the 3.3 volt rail, and none of them are good.
First, the SRAM module marked MT48LC32M16A2 on the chip, has an absolute max VCC of 3.6 volts, this most likely got fried, and if it is fried the FPGA can’t initialize it, and might hang.
Lucky for me the USB chip CY7C68013A appears to be 5.0 volt tolerant, at least for USB inputs, so hopefully the power rails are too to some extent. This can be replaced as well.
The part that I hope has not fried is the FPGA since it appears to have on board FLASH and there seems not to be a way to reload the FLASH. Even if I obtained a new part and got it on the boards, I am sure it has code protection enabled, and won’t be easy to dump from the working Beagle 480. The FPGA has 1K of FLASH ROM onboard and most likely it is programmed. However, there is a 24LC64 EEPROM chip connected to it, most likely to save user settings, but if I luck out and the execution code is stored in there, that would be cool, it is also easy to dump and copy.
Things that I need to check out that I don’t have the tools for are if the FPGA is actually working… is the clock crystal ticking… I don’t have an oscilloscope on hand to verify this.
To be continued when I have the opportunity to use an oscilloscope to verify that the FPGA is indeed functioning. In the mean time I can at least place an order for spare parts and swap some out to see if it comes back to life.
Below I am listing all the part information for what I have found, and hopefully this helps save someone some time.
To the best of my knowledge these are correctly, but I would encourage you to verify again to make sure the package information is correct, etc.
10-pin SOIC marked “AIO”
Texas Instruments
TPS62007DGS
Buck Switching Regulator IC Positive Fixed 3.3V 1 Output 600mA 10-TFSOP, 10-MSOP (0.118″, 3.00mm Width)
http://www.ti.com/lit/ds/symlink/tps62003.pdf
Digikey part 296-12517-5-ND
10-pin SOIC marked “AVE”
Texas Instruments
TPS60503DGS
Charge Pump Switching Regulator IC Positive Fixed 1.5V 1 Output 250mA 10-TFSOP, 10-MSOP (0.118″, 3.00mm Width)
http://www.ti.com/lit/ds/symlink/tps60500.pdf
Digikey part 296-12516-5-ND
MT48LC32M16A2TG-75:IT:CTR
Alliance Memory, Inc.
IC SDRAM 512MBIT 133MHZ 54TSOP
http://www.alliancememory.com/pdf/dram/512M-SDRAM-MT48LC32M16A2P-20140714.pdf
Digikey part 1450-1277-1-ND
TP450110 TQFP144 (first possibility based on VCC and GND pin matching)
Microsemi
ProASIC3e (A3P060)
A3P060-TQG144
IC FPGA 91 I/O 144TQFP
http://www.microsemi.com/document-portal/doc_download/130704-ds0097-proasic3-family-flash-fpgas-datasheet
Digikey part 1100-1016-ND
TP450110 TQFP144 (second possibility based on VCC and GND pin matching)
ProASIC3e (A3P125)
A3P125-TQG144
IC FPGA 100 I/O 144TQFP
http://www.microsemi.com/document-portal/doc_download/130704-ds0097-proasic3-family-flash-fpgas-datasheet
Digikey part 1100-1024-ND
Microchip
24LC64
IC EEPROM 64KBIT 400KHZ 8TSSOP
http://www.microchip.com/mymicrochip/filehandler.aspx?ddocname=en011843
Digikey part 24LC64T-I/STTR-ND
USB3300
Microchip Technology
USB Controller USB 2.0, OTG ULPI Interface 32-QFN (5×5)
http://www.microchip.com/mymicrochip/filehandler.aspx?ddocname=en562663
Digikey part USB3300-EZK-CT-ND
USB1T11A
Fairchild Semiconductor
1/1 Transceiver Half USB 1.1 14-TSSOP
https://www.fairchildsemi.com/datasheets/US/USB1T11A.pdf
Digikey part USB1T11AMTCXCT-ND
LMH6559
Texas Instruments
Buffer Amplifier 1 Circuit SOT-23-5
http://www.ti.com/lit/ds/symlink/lmh6559.pdf
Digikey part LMH6559MF/NOPBCT-ND
Related to the 3.3 volt power supply (seems an exact match)
10µF Molded Tantalum Capacitors 10V 1206 (3216 Metric) 3.8 Ohm 0.126″ L x 0.063″ W (3.20mm x 1.60mm)
Digikey part 399-3684-1-ND
Related to the 3.3 volt power supply (not quite an exact match, but close, slightly larger)
15µH Shielded Wirewound Inductor 1.7A 66 mOhm Max Nonstandard
Digikey part 553-1081-1-ND