
This took a while to get back to but I actually just now bricked my Sheeva64 (corrupted U-Boot) so I could repeat this procedure and make sure everything works correctly.
The layout of the blog doesn’t help with making this easy to read, especially the longer lines, going to look into trying out some different themes soon to address this…
I am actually writing this up as I am confirming and actually doing the steps, so hopefully it all goes well, if not I will have a cool new paperweight!
I just ran through ALL the instuctions written here again after writing this, so there should be no issues, if there are, please leave me a comment!
First of all a brief introduction to the bootloader and some general information… can be skipped if you are familiar with it, just to be complete I will include it.
This is a procedure that took a while to work out, after that I was directed to the official method by GlocabScale Technologies, which I will also provide at the end.
When we are talking about a bricked Sheeva64 there are a few different ways to brick it…
1. Somehow or another the kernel image or internal eMMC (SD card) or whatever you are booting off from is corrupted.
This is actually not very serious and can be repaired without much trouble, which I will write about in another post.
2. The bootloader (U-Boot) is corrupted or been erased. U-Boot is essentially what is first executed when the Sheeva64 CPU is turned on.
U-Boot is responsible for a couple of very important functions, first it initializes very low level stuff.
This includes things like the CPU clocks, DDR memory controller and other peripherals, ethernet, etc.
It this provides this information to the kernel that is loaded so the kernel knows what devices exist, etc in the hardware.
U-Boot, having support for FAT and sometimes other filesystems, reads the kernel image (its only a few megabytes) and
copies that into DDR memory at a predetermined expected address then executes that kernel code.
This essentially loads the kernel and passes control to the kernel which then loads the operating system, following a similar path to how a normal x86/x64 system boots up.
The difference here with the Sheeva64 it is does not have a traditional BIOS, which is normally responsible for low level initialization functions in a x86/x64 PC. This is where U-Boot comes in, it takes on the role of low level initializtion and then loads and executes the kernel.
This U-Boot loader is stored in a small chip called a SPI NOR (or NAND) memory chip, it only has a few megabytes of storage space, just enough for the U-Boot loader to fit.
If this bootloader (the code first executed by the Sheeva64 CPU) is not present… nothing happens when you turn it on… the device is practically bricked.
While the Sheeva64 is bricked, and there is no bootable U-Boot in the SPI NOR flash, it can still be brought up manually, but, after it is brought up a new U-Boot will need to be written to restore the ability for the Sheeva64 to self boot again.
With the DreamPlug, another product by GlobalScale Technologies, which I have used for many years, it was possible to connect a JTAG debugger to the CPU and put the CPU into debug mode and upload a U-Boot image into the DDR memory, then execute it, allowing the DreamPlug to be brought up when U-Boot was corrupted.
However, while I can JTAG into the Sheeva64 CPU (I have tried) I can read the CPU ID information, etc, but have not managed to be able to initialize the CPU correctly or bring it up by hand through the JTAG debug interface, and I think this has something to do with the new security features of the new Armada A3700 CPU. It requires a very specific initialization sequence to be followed, and lucky for us, it has its own debug interface now which is automatically entered if U-Boot can’t be loaded, or if a boot mode jumper is set.
Basically, long story short, you don’t even need to open up the Sheeva64 to be able to recover the U-Boot since JTAG access is no longer necessary.
We are going to use the recovery prompt built into the A3700 CPU available through the debug serial port (mini USB) connection.
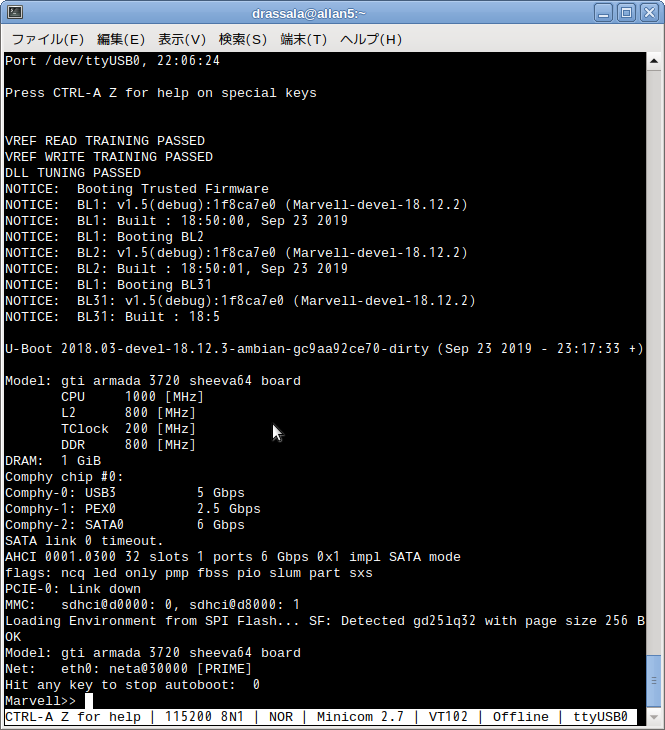
Now onto the recovery process… first we are going to verify that the recovery command prompt shows up correctly on your Sheeva64.
Connect a micro USB table to the debug port on the Sheeva64 and open a serial terminal using the following settings… 115200-8-N-1
I am going to upload a python program that can also be used, and I recommand and encourage you to look at the python source before executing it on your own PC to make sure it doesn’t contain anything bad…
python3 -m serial.tools.miniterm –raw –eol CR –encoding ascii /dev/ttyUSB0 115200
The debug USB (serial) port on the Sheeva64 is powered from the USB connection so you won’t lose the USB connection if power is removed from the Sheeva64, which is good for us because we will need a way to reset it.
With the cable connected, and your serial terminal open, reset the Sheeva64 by unplugging it and plugging it back in, you should see a prompt similar to this image…
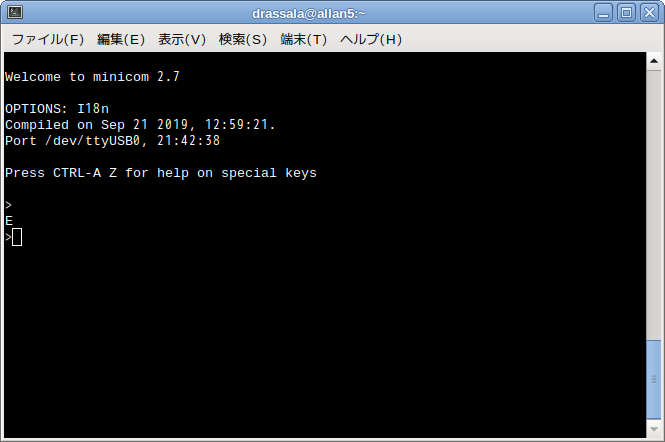
Just press enter here and if you get a “E” or error response back you are good, you have access to the CPU recovery console.
Next we are going to instruct the CPU to expect an upload of some bootable code, there are a few files that have to be uploaded, and it will take some time.
I am going to provide the files that I generated here, which is a lengthy process, which I will also outline how to do in this post.
Grab the “sheeva64_debricker_20191203.tar.bz2” file and extract it to a location of your choice, it should all be self-contained.
tar -xjf sheeva64_debricker_20191203.tar.bz2
https://www.drassal.net/downloads/sheeva64_debricker_20191203.tar.bz2
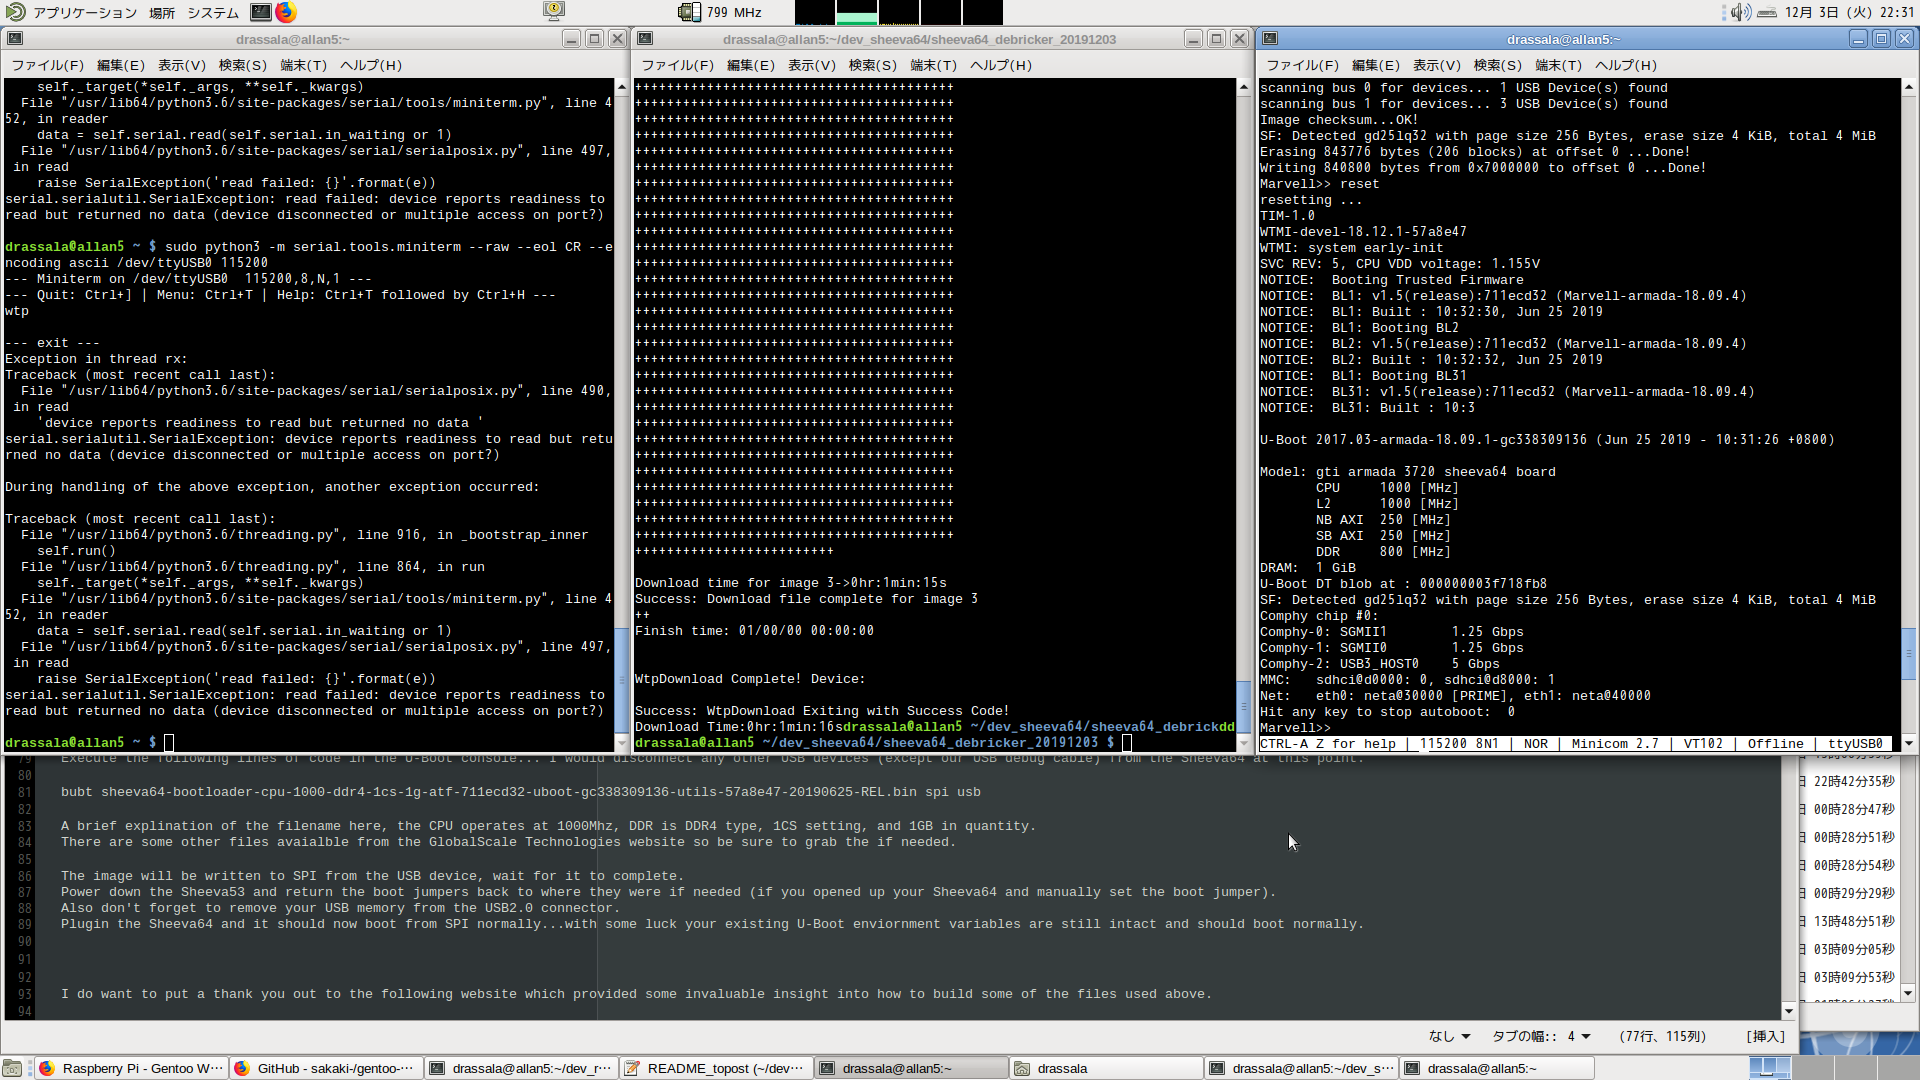
We are going to do a couple things, and they have to be done rather quickly, so having three terminal windows ready to execute these commands might be useful.
I recommend having the following three terminal windows open and will refer to them as termianl 1, 2, and 3.
1. The terminal with the recovery console open, it turns out the python script above is a little more friendly as it auto disconnects correctly when we execute the next command in terminal 2.
2. The terminal that we will use to upload the new RAM bootable U-Boot image and other related processor specific code.
3. The terminal that you will use with minicom or your favorite terminal software to open as soon as the CPU is executing the U-Boot.
Here is am image of how I had my screen setup for this, lining up each window side by side.
Change to the folder that the above tar.bz2 file was extracted in for terminal 2, we will be executing some things from in there.
As a note, this process might need sudo access to the /dev/ttyUSB0 device, if you are not comfortable with this setup a VM to sandbox this, or setup a throw away livecd install on another machine.
/dev/ttyUSB0 is assumed below, please adjust things if necessary…
After U-Boot loads up, it will continue, just like normal, to load up your kernel and start up your OS, we don’t want that to happen so be quick to connect up in terminal 3 and press that “any key” to interrupt the U-Boot process… most likely your OS will not even load correctly as this RAM version of U-Boot functions just enough to bring the system up to rewrite the U-Boot loader into SPI NOR flash.
There are a couple small things to warn about. This RAM loaded U-Boot is capable of overriting your enviornment variables, so don’t try to save any U-Boot settings, it might foul them up.
If your U-Boot settings are also corrupted, I will include some instructions below to reset those back.
Here is the sequence we are going to do…
I think you will need pyserial for this, some reference is here https://pyserial.readthedocs.io/en/latest/tools.html
If you can’t use the below command it doesn’t hurt to try another serial software and disconnect it after typing in the wtp command.
On terminal 1 execute
sudo python3 -m serial.tools.miniterm –raw –eol CR –encoding ascii /dev/ttyUSB0 115200
type “wtp” and press enter.
The CPU will be put into a mode to wait for an upload from this same USB serial debug cable you are connected to now.
On terminal 2, execute the following command…
sudo ./WtpDownload_linux -P UART -C 0 -R 115200 -B TIM_ATF.bin -I wtmi_h.bin -I boot-image_h.bin -E
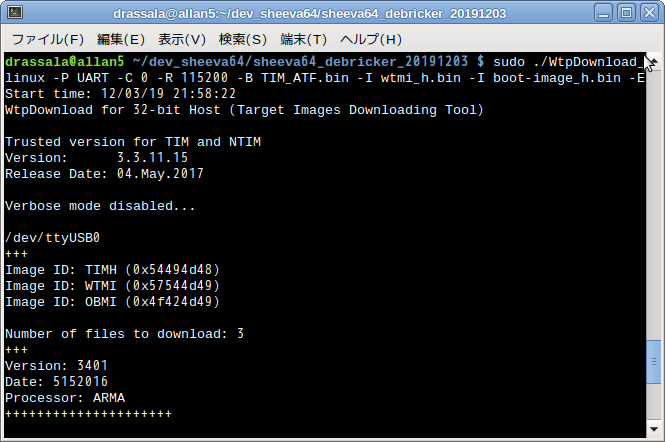
This is glitchy and sometimes does not work. It should not stop, or appear frozen during any time of execution.
If it appears frozen, something went wrong, Ctrl + C it and reset the Sheeva64 by unplugging and reconnecting power… wait a few seconds after unplugging to be sure its fully reset.
After it is reset, do the above wtp step again to put it in the serial upload mode and try again. It took me many attempts to figure this part out, but it can be a little finicky.
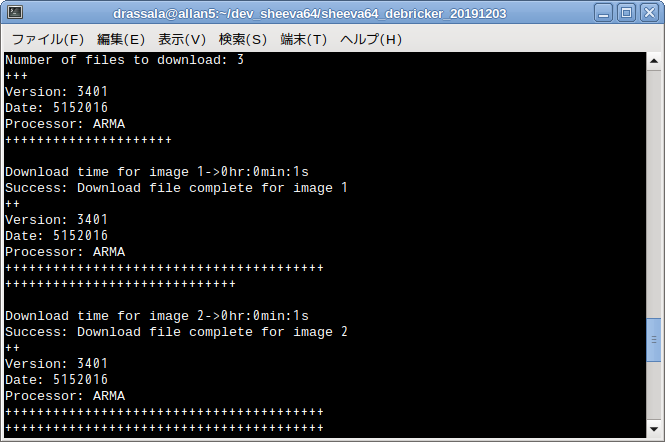
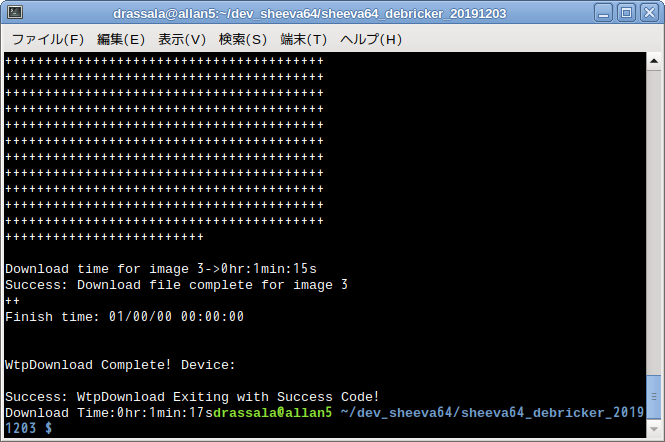
The upload process will take a little over a minute to complete (around 1min and 15sec on my setup), be watching your screen and be prepared to connect minicom or another serial terminal software quickly (on terminal 3), you need to interrupt the boot sequence, press any key when that message pops up (on terminal 3) to interrupt the startup process.
After upload is complete and command prompt is returned on terminal 2 get connected on terminal 3 and now we should have a U-Boot interface to work with.
Remember, now U-Boot is running from RAM so if we reset or remove power now we have to begin again from step 1, we still havent’t copied the bootloader back into the NOR flash, this is the next step.
Grab a USB memory stick that you have laying around, it should be formatted VFAT or FAT32 (possibly FAT16 works too) and copy the sheeva64-bootloader-cpu-1000-ddr4-1cs-1g-atf-711ecd32-uboot-gc338309136-utils-57a8e47-20190625-REL.bin over to it in the root folder. This is in the “u-boot_images” folder in the “sheeva64_debricker_20191203.tar.bz2” file.
A brief explination of the filename here, the CPU operates at 1000Mhz, DDR is DDR4 type, 1CS setting, and 1GB in quantity.
There are some other files avaialble from the GlobalScale Technologies website so be sure to grab the if needed.
Insert this into the Sheeva64’s bottom USB2.0 port, the USB3.0 won’t work, I think the USB3.0 driver is not working correctly in the make-shift recovery bootloader yet…
Execute this command in the U-Boot console, this will rewrite your bootloader…
bubt sheeva64-bootloader-cpu-1000-ddr4-1cs-1g-atf-711ecd32-uboot-gc338309136-utils-57a8e47-20190625-REL.bin spi usb
This will take a little time to complete, be patient and give it some time, erasing and writing to NOR flash isn’t the fastest thing in the world.
Once writing to the NOR flash is complete the USB memory stick can be removed and you can reset the Sheeva64 with the “reset” command.
It should now self-boot into the U-Boot console. Next, if your U-Boot enviornment variables are fouled up you will still have to fix those, but, the hard part is done.
To fix the U-Boot variables execute the below commands in the U-Boot console…
*** none of these commands will save until the “saveenv” or “hw_info store” command is used, so if you make a mistake, just use “reset” and try again.
*** these fix the enviornment variables
env default -a
setenv image_name boot/Image
setenv fdt_name boot/armada-3720-sheeva64.dtb
setenv bootcmd ‘mmc dev 1; ext4load mmc 1:1 $kernel_addr_r $image_name; ext4load mmc 1:1 $fdt_addr_r $fdt_name; setenv bootargs $console root=PARTUUID=89708921-01 rw rootwait net.ifnames=0 biosdevname=0; booti $kernel_addr_r – $fdt_addr_r’
saveenv
*** these will fix your ethernet address, if it somehow got changed…
*** ethaddr is printed on the label on the back of the Sheeva64, but I don’t know where eth1addr comes from, I am going to have to bring this up to GlobalScale and ask them about it.
setenv pcb_rev 5.0.1
setenv ethaddr xx:xx:xx:xx:xx:xx
setenv eth1addr xx:xx:xx:xx:xx:xx
saveenv
hw_info store
*** the below command will execute the boot process
boot
This concludes the recovery process of the U-Boot boot loader. If the SD card or internal eMMC is corrupted, this is a different recovery procedure.
There is information on the GlobalScale Technologies website here to help with that…
https://www.globalscaletechnologies.com/p-86-sheeva64.aspx
From here open up the Downloads section and V5.
A direct link is also below
ftp://108.178.146.214/downloads/Sheeva%2064/V5/
I have trouble opening this up in Safari on my MacBook, it seems FTP is not a built in feature of browsers anymore…
Next, if the above binary does not work for you, or you want to build this from scratch and get your own U-Boot enviornment setup, this next section is for you.
I do want to put a thank you out to the following website which provided some invaluable insight into how to build some of the files used above.
Original source for some of this information is here… it is a good read, but also quite a bit technical.
http://tinkering-is-fun.blogspot.com/2019/02/espressobin-building-u-boot.html
Now onto the more technical explination and how to generate the needed files from scratch. All necessary things are open source and avaiable to download as of this writing.
To generate everything I used from scratch, first download the following four sources and set the branches to the things listed below…
I will provide the exact commands below.
marvel-tools: https://github.com/MarvellEmbeddedProcessors/A3700-utils-marvell, branch A3700_utils-armada-18.12
marvell-ddr: https://github.com/MarvellEmbeddedProcessors/mv-ddr-marvell.git, branch mv_ddr-armada-18.12
ATF: https://github.com/MarvellEmbeddedProcessors/atf-marvell, branch atf-v1.5-armada-18.12
U-Boot: https://github.com/MarvellEmbeddedProcessors/u-boot-marvell.git, branch u-boot-2018.03-armada-18.12
This is going to be wierd, but we will need not one, but two GCC toolchains to build this correctly.
The first toolchain is for the ARM64 Sheeva64 Marvell Armanda A3700 SoC (CPU).
The second toolchain is for our own PC, to generate the code. I am assuing you are on a x86 or x64 system here…
If your platform is different (this was performed on a x64 based i7 platform), please modify the instructions to your setup… which I will not go into detail here how to do this…
gcc-linaro-5.5.0-2017.10-x86_64_aarch64-linux-gnu
gcc-linaro-5.5.0-2017.10-x86_64_arm-linux-gnueabi
Will other toolchains work? Maybe, but why not just use what is known to work for this process… then once you have a working setup you can experiment with other things such as toolchains.
I am going to host all these files on this blog site for completeness sake, and for the reason that stuff on the internet goes missing a lot these days and links break.
A few of the harder to extract parts are here for download hosted here, but they were originally sourced from open source sources. For these few files I will add a section of how to extract these at a later date.
Then of course, if you are in doubt at all about trusting anything you download here, set yourself up a sandboxed or a throw-away VM machine and conduct the Sheeva64 recovery from a system that you have no concerns about breaking.
As of writing this post I tested each step as writing the instructions so everything should be good.
I am going to basically write somewhat of a script below, and you should almost be able to copy paste line-for-line and just execute them.
First we need to make a folder for where we will be working from, and I am choosing the following.
mkdir /home/user/sheeva64_debricker
cd /home/user/sheeva64_debricker
mkdir /home/user/sheeva64_debricker/downloads
cd /home/user/sheeva64_debricker/downloads
wget https://releases.linaro.org/components/toolchain/binaries/latest-5/aarch64-linux-gnu/gcc-linaro-5.5.0-2017.10-x86_64_aarch64-linux-gnu.tar.xz
wget https://releases.linaro.org/components/toolchain/binaries/5.5-2017.10/arm-linux-gnueabi/gcc-linaro-5.5.0-2017.10-x86_64_arm-linux-gnueabi.tar.xz
wget https://www.drassal.net/downloads/sheeva64_debricker_blobs.tar.bz2
wget https://www.drassal.net/downloads/sheeva64_debricker_patches.tar.bz2
wget https://www.drassal.net/downloads/sheeva64_debricker_u-boot_images.tar.bz2
*** extract some misc necessities
cd /home/user/sheeva64_debricker
tar -xjvf /home/user/sheeva64_debricker/downloads/sheeva64_debricker_blobs.tar.bz2
tar -xjvf /home/user/sheeva64_debricker/downloads/sheeva64_debricker_patches.tar.bz2
tar -xjvf /home/user/sheeva64_debricker/downloads/sheeva64_debricker_u-boot_images.tar.bz2
mkdir /home/user/sheeva64_debricker/toolchains
cd /home/user/sheeva64_debricker/toolchains
*** extract the downloaded toolchains here
tar -xvpf /home/user/sheeva64_debricker/downloads/gcc-linaro-5.5.0-2017.10-x86_64_aarch64-linux-gnu.tar.xz
tar -xvpf /home/user/sheeva64_debricker/downloads/gcc-linaro-5.5.0-2017.10-x86_64_arm-linux-gnueabi.tar.xz
*** grab the required utilities
mkdir /home/user/sheeva64_debricker/utils
cd /home/user/sheeva64_debricker/utils
git clone https://github.com/MarvellEmbeddedProcessors/A3700-utils-marvell
cd A3700-utils-marvell
git checkout A3700_utils-armada-18.12
cd /home/user/sheeva64_debricker/utils
git clone https://github.com/MarvellEmbeddedProcessors/mv-ddr-marvell.git
cd mv-ddr-marvell
git checkout mv_ddr-armada-18.12
cd /home/user/sheeva64_debricker/utils
git clone https://github.com/MarvellEmbeddedProcessors/atf-marvell
cd atf-marvell
git checkout atf-v1.5-armada-18.12
cd /home/user/sheeva64_debricker/utils
git clone https://github.com/MarvellEmbeddedProcessors/u-boot-marvell.git
cd u-boot-marvell
git checkout u-boot-2018.03-armada-18.12
*** build the tools
cd /home/user/sheeva64_debricker/utils/atf-marvell
make DEBUG=1 USE_COHERENT_MEM=0 LOG_LEVEL=20 SECURE=0 CLOCKSPRESET=CPU_800_DDR_800 DDR_TOPOLOGY=2 BOOTDEV=SPINOR PARTNUM=0 PLAT=a3700 CROSS_COMPILE=/home/user/sheeva64_debricker/toolchains/gcc-linaro-5.5.0-2017.10-x86_64_aarch64-linux-gnu/bin/aarch64-linux-gnu-
cp /home/user/sheeva64_debricker/blobs/espressobin/DDR_TOPOLOGY_2-*.txt /home/user/sheeva64_debricker/utils/A3700-utils-marvell/tim/ddr/.
cd /home/user/sheeva64_debricker/utils/u-boot-marvell
git apply /home/user/sheeva64_debricker/patches/u-boot/u-boot-mvebu64/0001-espressobin-enable-emmc.patch
cp /home/user/sheeva64_debricker/patches/u-boot/dts/armada-3720-sheeva64.dts /home/user/sheeva64_debricker/utils/u-boot-marvell/arch/arm/dts/.
cp /home/user/sheeva64_debricker/utils/atf-marvell/build/a3700/debug/bl31.bin /home/user/sheeva64_debricker/utils/u-boot-marvell/.
cd /home/user/sheeva64_debricker/utils/u-boot-marvell
make mvebu_espressobin-88f3720_defconfig CROSS_COMPILE=/home/user/sheeva64_debricker/toolchains/gcc-linaro-5.5.0-2017.10-x86_64_aarch64-linux-gnu/bin/aarch64-linux-gnu-
make DEVICE_TREE=armada-3720-sheeva64 LOCALVERSION=-ambian CROSS_COMPILE=/home/user/sheeva64_debricker/toolchains/gcc-linaro-5.5.0-2017.10-x86_64_aarch64-linux-gnu/bin/aarch64-linux-gnu-
if compiler error because gcc is too old, edit the below file
vi /home/user/sheeva64_debricker/utils/u-boot-marvell/arch/arm/config.mk
change line 70, the version change “0600” to “0500” to bypass the gcc version check, then try again, messy, but works
make DEVICE_TREE=armada-3720-sheeva64 LOCALVERSION=-ambian CROSS_COMPILE=/home/user/sheeva64_debricker/toolchains/gcc-linaro-5.5.0-2017.10-x86_64_aarch64-linux-gnu/bin/aarch64-linux-gnu-
cd /home/user/sheeva64_debricker/utils/atf-marvell
make MV_DDR_PATH=/home/user/sheeva64_debricker/utils/mv-ddr-marvell CROSS_COMPILE=/home/user/sheeva64_debricker/toolchains/gcc-linaro-5.5.0-2017.10-x86_64_aarch64-linux-gnu/bin/aarch64-linux-gnu- DEBUG=1 USE_COHERENT_MEM=0 LOG_LEVEL=20 SECURE=0 CLOCKSPRESET=CPU_1000_DDR_800 DDR_TOPOLOGY=5 BOOTDEV=SPINOR PARTNUM=0 PLAT=a3700 all fip BL33=/home/user/sheeva64_debricker/utils/u-boot-marvell/u-boot.bin WTP=/home/user/sheeva64_debricker/utils/A3700-utils-marvell CROSS_CM3=/home/user/sheeva64_debricker/toolchains/gcc-linaro-5.5.0-2017.10-x86_64_arm-linux-gnueabi/bin/arm-linux-gnueabi-
All the above commands hopefully finished without error…
The U-Boot that is built using this method is actually ment for the EspressoBIN, which is based off the same Marvell A3700 Armanda SoC, but with different peripherals, therefore it is not 100% stable on the Sheeva64, but stable enough to reload the factory U-Boot image, which is all we really need it for.
Now you have built all the necessary files to boot the Sheeva64 from a bricked (very very bricked) state.
The loading command will change a little since we need to reference the files that are all spread out that we just made.
I have found this easiest to do the following way…
We still use our original commands in terminal 1 to set the wtp mode.
sudo python3 -m serial.tools.miniterm –raw –eol CR –encoding ascii /dev/ttyUSB0 115200
In terminal we will modify some stuff, change to the following folder, then execute the load command.
cd /home/user/sheeva64_debricker/utils/atf-marvell/build/a3700/debug/uart-images
sudo /home/user/sheeva64_debricker/utils/A3700-utils-marvell/wtptp/linux/WtpDownload_linux -P UART -C 0 -R 115200 -B TIM_ATF.bin -I wtmi_h.bin -I boot-image_h.bin -E
This will start the upload process as above, and the final recovery process is the same, copy the sheeva64-bootloader-cpu-1000-ddr4-1cs-1g-atf-711ecd32-uboot-gc338309136-utils-57a8e47-20190625-REL.bin file (located in u-boot_images) to a USB memory stick, insert it into the USB2.0 port (by the ethernet port) and finish recovery with the below command.
bubt sheeva64-bootloader-cpu-1000-ddr4-1cs-1g-atf-711ecd32-uboot-gc338309136-utils-57a8e47-20190625-REL.bin spi usb
I really hope the above information is useful as I had to do most of this from scratch as this is still kind of a new device with little resources available.
GlobalScale Technologies does have some recovery inforation, which I will share, but I have not personally tested it yet.
There might be a easier recovery method, but the above method should 100% gurantee a recovery.
Finally, here are the commands to execute in the U-Boot console to reset your enviornment variables…
*** none of these commands will save until the “saveenv” or “hw_info store” command is used, so if you make a mistake, just use “reset” and try again.
*** these fix the enviornment variables
env default -a
setenv image_name boot/Image
setenv fdt_name boot/armada-3720-sheeva64.dtb
setenv bootcmd ‘mmc dev 1; ext4load mmc 1:1 $kernel_addr_r $image_name; ext4load mmc 1:1 $fdt_addr_r $fdt_name; setenv bootargs $console root=PARTUUID=89708921-01 rw rootwait net.ifnames=0 biosdevname=0; booti $kernel_addr_r – $fdt_addr_r’
saveenv
*** these will fix your ethernet address, if it somehow got changed…
*** ethaddr is printed on the label on the back of the Sheeva64, but I don’t know where eth1addr comes from, I am going to have to bring this up to GlobalScale and ask them about it.
setenv pcb_rev 5.0.1
setenv ethaddr xx:xx:xx:xx:xx:xx
setenv eth1addr xx:xx:xx:xx:xx:xx
saveenv
hw_info store
*** the below command will execute the boot process
boot